In this issue:
- Traveling with Trip Boss
- Creating YOUR travel manager
- Modules working together
- Customizing
- Just ask!
- App Update: Recipe Manager on iPad
- Most Frequently Asked Questions:
- Can I copy my data across devices?
- How do I backup my data?
- Tip: Adding new ingredients
- Tip: Closing Apps You're Not Actively
Using (saves on memory)
- Styling Recipe Manager
|
|
App Update
 |
|
Recipe
Manager
with
Serving
Sizer
for iPad
(formerly Serving Sizer Recipe Cards)
|

Updated
ver. 1.4.4:
✔ Added choice for entry using
decimal values OR fractions. (customer request)
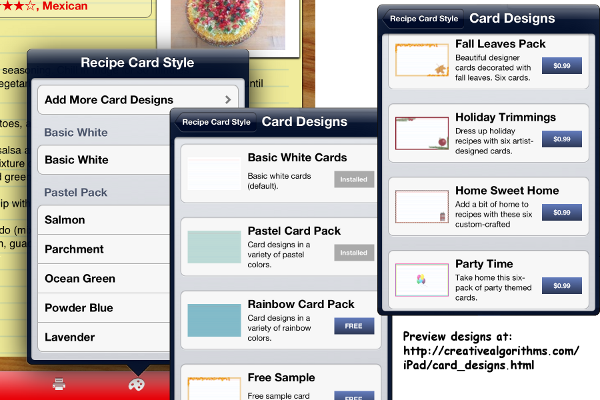
✔ New recipe card style! Party Time.
Personalize your cards with
custom card styles, available through the artist's pallet icon on the
edit screen--Add More Styles, free and for in-app purchase. More styles
forthcoming.
✔ Increased maximum amount value to 5 digits, useful
for units with typically larger quantities, like ml. (customer
suggestion)
✔ Updated for iOS6.1.
✔ Slight tweak to the icon (brighter)
✔ Misc. bug fixes, enhancements, and
optimizations.
|
|
Most Frequently
Asked (and answered) Questions
|
|
Q: How can I copy
data across devices?
A: All our
apps with data are set up for File Sharing in iTunes. With File
Sharing, you can copy database information from one device to another.
This is not a true sync, but an overwrite, but it works well if you
designate one device as a "master" and rest as receiving devices. File
Sharing is also a great way to create a backup of your databases,
outside of the full restore set up in iTunes or iCloud backup.
Here's how:
1) Connect the Master device to iTunes. On the Apps tab, find File
Sharing, and scroll down to the appropriate app (Recipe Manager/Serving
Sizer Pro/Trip Boss).
2) Copy the database to your computer. (ss.db or tb.db). Apple has a good tutorial
on their website, which is applicable to both iPad and iPhone apps.
3) Connect the Receiving device to iTunes. Using File Sharing copy (and
overwrite) the database back into iTunes.
Now the data is on both devices!
4) One last step is necessary, however. The
receiving device must have the app completely closed to reload the new
database. This step is important because info you add before the reload
will not be saved to the database you just transferred. Ref. the
Closing Apps part of this newsletter if you need to know how.
Note:
The database for Recipe Manager with
Serving Sizer (iPad) and Serving
Sizer Pro (iPhone) is designed the same, so you can copy between
the two apps.
Q: How do I backup
my data: recipes or trips??
A: You can
backup your files generically by syncing
with iTunes, enabling iCloud
backup, but we also offer File
Sharing for individual database backups for our apps.
Follow steps 1) & 2) above to save a backup file. Steps 3)
& 4) cover how to load the backup back onto the device.
|
|
 How To: Closing
Apps You're Not Actively Using How To: Closing
Apps You're Not Actively Using |
|
Too
Many Sleeping Apps can Affect Memory and
Performance
|
When you open
an app on the iPad and the iPhone, it stays open when you launch a new
app, but it sleeps, until you or the operating system closes it (or you
launch it again). The operating system will close it when it needs
memory, when your memory is at max. However, sometimes this is not
handled very well and apps can act up or things can run slow, since
your memory is at always at maximum use. And, if you've recently used File Sharing, you'll want to
close the app and reopen it so that the new database will load.
It's good to periodically close out the apps you haven't used in a
while. If you have not done this before, here's how:
1) Close the app you are using, so you are on the launcher screen of
apps.
2) Double click the Home button. A tray of apps will appear at the
bottom.
3) Scroll through to find an app that's acting up (that you want to
close/reset) or find an app you aren't using.
4) Tap and hold the icon until the icons in the tray start to wiggle. A
minus "-" sign appears in the corner of the icon.
5) Tap the minus sign on all the apps you wish to close completely.
6) Double click the Home button again to close the tray and you are
done!
|
 Follow
us on twitter: Follow
us on twitter:
CreativeAlgthms
|
 |
Become
a
Facebook
fan or follow
us
on twitter for
up-to-date announcements of updates, new releases, conversation, and
occasional promo
codes for free copies of our software. |
|
|
Creating
YOUR travel manager with
Trip Boss

|
|
Trip Boss travel manager is a
one-of-a-kind travel app because it's modular. We offer three unique
modules: Expenses & Budget, Itinerary Manager, and Journal. Plus we have a few tool
add-ons as well: Currency Converter,
Travel Time
Calculator and Tip Calculator
(also sold separately) Some of these tools are included with a
module as a bonus. What makes it unique is you can combine the
modules, which interact and share data, to make one powerful travel
app.
Pick one module to start, try it out,
then add on any of the other modules through in-app purchase on our
Store inside the app. In-app purchases are made just like an AppStore
purchase, but instead inside the app. These unlock additional content,
the modules in Trip Boss' case. Just tap our Store icon, then tap
a module in the vending machine to find out more. Tap the price button
to start a purchase. Confused on in-app purchase? Apple
has a guide now available.
For more information on what is included with each module, please have
a look at our overview
page.
|
| Modules
Working Together |
One of the
best ways the modules work together is the Expense & Budget with
Itinerary. As you are constructing your itinerary, you can add an
expense right in the itinerary entry by tapping the forward arrow in
the tool bar. The expense is added to your expense report, just like
that.
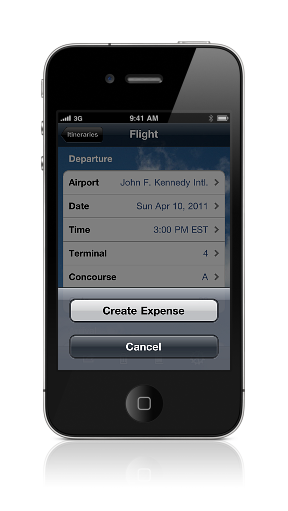
This feature works both ways. Let's say you decided to stop at the zoo
while on vacation. You enter your entrance fees, but want to note this
side trip on your itinerary, for future reference. While entering the
expense, just add the itinerary item, again using the forward arrow in
the toolbar. Great for noting restaurants you've visited as well. The
possibilities are endless.
|
| Customizing |
Trip Boss is
so powerful because it's flexible and customizable. We tried our best
to include default settings and international units, but hey, travel is
complex, and your travel manager should be, too.
So if you don't like what we started with, you can add new places,
categories, types, and defaults.
In many cases, we've added some cool shortcuts. For example, set
up your home location in Settings. Then tap Home Airport, tap the Get
Location icon in the toolbar (the arrow) and the app will detect the
closest airport to your location. How cool is that?
Tap on the Settings icon to set up all of the above, then tap on the
File Cabinet icon to set up some Travel Data. Or don't. You can add
things on the fly as you travel, or get all your ducks in a row before
even starting a trip.
Now, one of the drawbacks of a complex, customizable, flexible app is
finding everything. We don't have a manual, but we pride ourselves in
awesome customer service, so...
Just Ask!
|
Check out the
little "i" button within the app. For quick, basic help, tap "Find Help
for..." to see our help webpage. Otherwise, just tap "Contact us via email"
and send us a short note. With few exceptions we respond no later than
2 business days (and more often MUCH quicker). Ask away. Share what
you'd like to see. This app is your travel manager and we want to
make the app part as easy as possible, so you can enjoy your travel!
|
|
|
|
 Tip: Adding New
Ingredients Tip: Adding New
Ingredients
|
|
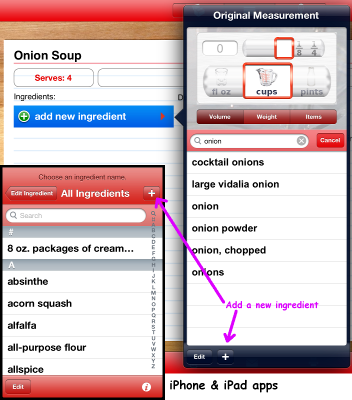
With Recipe Manager (iPad) and Serving
Sizer Pro (iPhone), you can add your own ingredients, if you don't find
them in the pick list of over 500 ingredients. Adding a new
ingredient also works for adding a mini instruction to an ingredient,
like "chopped" or "minced" or "to taste".
The iPad and iPhone have similar ways to add ingredients--just tap the
"+" in the popover (iPad) or at the top of the All Ingredients screen
(iPhone).
On the iPad, you can search for an ingredient (like "onion"), then if
it does not come up, just tap "+" to add the new ingredient. The
text you've already typed is remembered, so all you have to do is
finish it. In the above example, if I want to add "onion, minced" I can
tap "+", then add "minced." Tap outside the popover to accept the
ingredient.
On the iPhone, you can do a search, but if you do not find the
ingredient, tap "Cancel" then "+". The app remembers what you typed, so
just finish up the name and tap the blue Done button by the keyboard.
 Recipe Manager with
Serving Sizer (iPad): Recipe Manager with
Serving Sizer (iPad):

Serving Sizer Pro (iPhone):
For more the tips and tricks and FAQ's visit
our
app
help
pages for FAQ's or past
newsletters. As
we get
questions, we try to list them on our website for your convenience. We
also respond rather quickly, so please
feel
free
to
email us
with your
questions or feedback.
|
| Each
time we update an app, the review count resets. Positive reviews help
us sell better and in turn, help us to focus on updates and
enhancements, rather than other means of supplemental income. Your positive review is greatly appreciated
and is a win-win for everyone! |
|
|


