|
 Recipe
Manager Recipe
Manager
with Serving
Sizer™
for
iPad -
your recipes, organized for cooking
|
|
|
HOW
IT
WORKS:
Please
note: All features can be
viewed and used in either portrait or landscape
orientations. However,
some entry methods may vary.
|
|
|
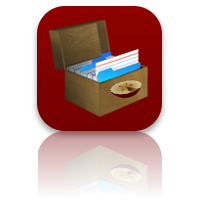
| Recipe Box
Screen: Adding New Recipes |
|
 |
 |
Overview:
On
this screen you can add new recipes;
search using the tabbed index; search by
category; search by name,
ingredient, and category; or select
a recipe to edit and/or cook. Tap
on the "i"
button in the bottom right corner for help or
contact information.
Adding a New Recipe or Selecting a Recipe
- Tap "+"
in top
right corner to add a new recipe.
- The white text at the top will note which
recipes are being displayed, based on search
or category filtering.
This text will say "All Recipes" when no
filters have been applied.
- Scroll upward by flicking to view more
recipes
or tap a letter on the side to quickly
navigate the alphabetical index.
- Tap on an index card to open a quick view
of a
recipe:
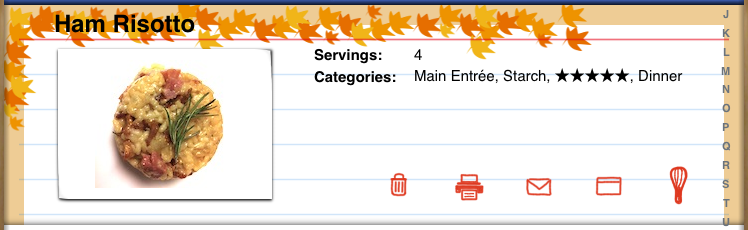
- Navigate by tapping on one of the icons:

- Trash can = delete recipe (cannot be
undone)
- Printer = print recipe on air-capable
printer
- Envelope = email recipe
- Recipe index card = edit recipe,
including
photo.
- Whisk = cook recipe (go directly to
cooking
mode)
- Tap on the "i"
button
at
the
bottom
of
the
screen
for
help
or
contact information.
Searching
by
Categories or Keywords
Toggle between Search
or Categories
by tapping the search
icon (magnifying glass) or the category icon
(folder) in the top left
corner.
By Search
Tapping the search icon will bring up a search
box. Type in
recipe name, ingredient, or category name to
search. Recipes will
filter as you type. If no recipes match the entry,
a "No Match..."
message will display.
|
By Categories:
Toggle between Search
or Categories
by tapping the search
icon (magnifying glass) or the category icon
(folder) in the top left
corner.
- Tap a category row to view only recipe cards
in
that category.
- Tap second category in same section to
include
more recipes.
- Tap second category in different section
to
eliminate some recipes.
- Tap a category twice to EXCLUDE it from
the
search.(Indicated with a
 .) .)
- Tap "Clear"
at bottom to CLEAR all
category selections.
When Recipes are filtered, white text at the top
will indicate by
what. If no recipes meet all the criteria, a
"No Match..."
message
will display.
- Tap "+"
at bottom of
the Categories popover to add a new category.
- Tap "Edit"
at
the
bottom
of
the
popover
to
move
a
category into
a new section or to rearrange, by using the
'grippers.' Delete a
category by tapping on the red circle.
- Tap "
 "
at top of the
Categories popover to
Edit Sections:
rearrange, delete, or add (by tapping "+" that
appears in new view). "
at top of the
Categories popover to
Edit Sections:
rearrange, delete, or add (by tapping "+" that
appears in new view).
- Tap back button labeled "Categories" to
finish.

- Rotate your iPad to view in portrait.
- Recipe Manager with Serving Sizer is
designed to be used in either Portrait or
Landscape Orientations.

|
|
|
|
| Recipe
Card
Screen:
Editing
Recipes |
 |
Top
Navigation Bar:
- Tap "recipe box" icon to select
recipe
cards and to search and sort by
categories.
- Tap on "whisk" icon to view recipes
for Cooking
Mode, full screen.
Recipe
Card:
- Tap on "Recipe
Name" to enter the recipe's
name.
- Tap on "Serves"
to
edit
the
serving
sizes.
- Enter recipe's original serving
size.
- Enter number of guests for new
serving
size--change any time your guest
list changes.
- Alternately, select Halve,
Original,
Double, Triple.
- Original resets the new serving
size to
Original number.
- Tap on "Categories"
to
designate
multiple
categories
for
the
recipe.
Editing
categories
and
sections
is
the
same
as
described on the recipe
card screen.
- Tap on "No Photo"
to add a photo. Choose from
"Photo Albums" on iPad.
- Tap under "Directions"
to pull up the keyboard
to enter steps for making the
recipe. Flick to scroll
directions
that are longer than the current view.
- Tap on "add
new
ingredient" to add
ingredients (see below for more
details). Flick
in
the ingredient area to
scroll
complete list of ingredients.
(add
new
ingredient will always be at
the end of the list, but may scroll
off the screen after filling up the
column with ingredients--scroll to
find). Tap on
ingredient row (or red arrow) to edit
existing ingredients.
Bottom
Tool Bar:
- Tap Edit
to rearrange or delete ingredients.
- Tap US/Metric
to change units.
- Tap on Trash
Can to delete the recipe.
- Tap on Envelope
to email converted recipe.
- Tap on Printer
to print the recipe.
- Tap on Artist
Palette to select Recipe Card
Style.
- Tap on Gear
to pick the optimization setting.
- Tap on "i"
for
contact,
help,
and
"about"
information.
To
Add Recipe Card
Styles:
- Tap Add
More to add more free and
for-purchase style packs.
- Enable
the
free
packs
or
purchase
(in-app
via
iTunes) specialty packs by
tapping the price. Preview
Styles
on our website.
- Tap back button "Recipe
Card Style" to view and
select available enabled styles.
- Just tap on the style name to change
the
card instantly.
- Tap outside the popover to accept.

|
|
|
 |
Adding
Ingredients:
- Tap "add
new
ingredient" at the bottom of the
ingredient list to add an ingredient. (Flick
to the bottom of the list
if you do not see this row--it may have
scrolled off the screen. Be
sure to touch on the ingredient side of
the page when scrolling. Ingredients and
Directions scroll
independently.)
- or Tap on the arrow to view/edit an existing
ingredient.
- A popover comes up:
- Enter amounts in whole numbers and fractions
(using slider).
- Pick units, sorted by type: Volume,
Weight, or Items
(for whole items like eggs,
or "cans of
beans").
- Select from 500+ ingredients. Find easily
via
search or side ABC index, or flick through the
list.
- Tap "+" in popover, at bottom, to add
a NEW
ingredient name. (Tip:
add a
row of dashes ---- to for separator).
Anything
entered in search
will pre-fill the new ingredient field.
- Tap "Edit" to edit existing ingredient
names.
Names can be as long as you wish.
- Tap outside the popover to accept
changes.
Tip: Select zero
"0" for the amount, and "Items" for the unit to
list ingredient name
only, like "salt, to taste".
|
|

- Email converted
recipes to friends and family.
|
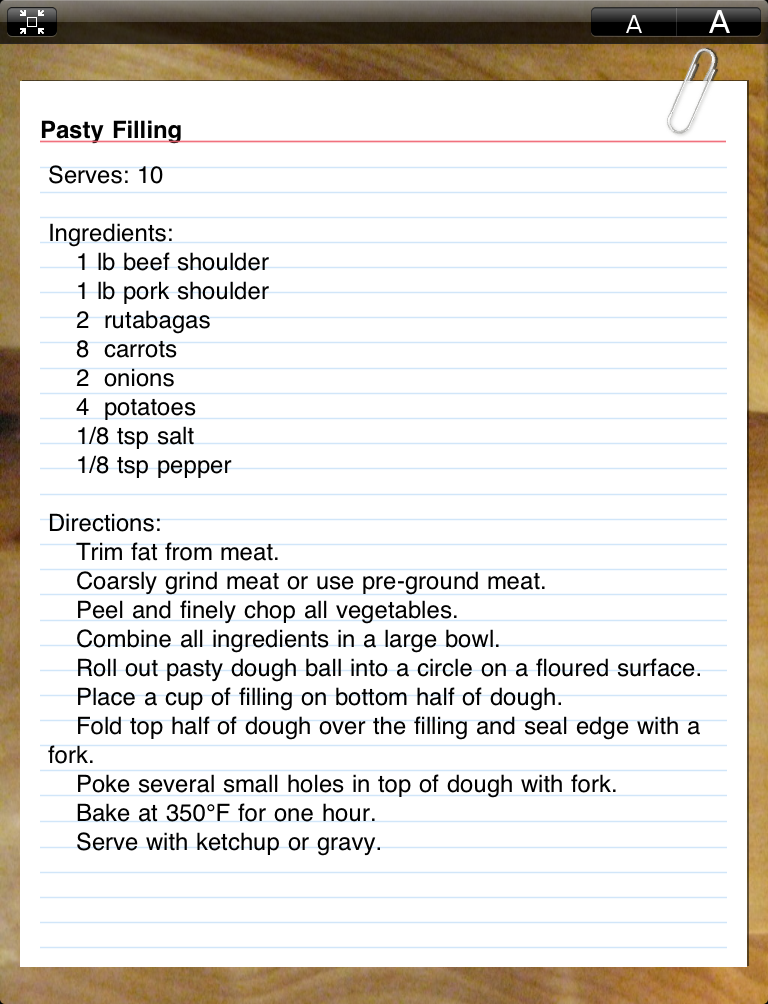
Cooking
Mode:
full
screen
for
cooking
|
- Tapping the Whisk icon from the recipe card
screen or recipe preview moves you to Cooking
Mode, at full screen.
This screen shows you the
complete converted recipe, for
ease of use when cooking.
- Rotate to view in landscape.
- Tap the font buttons A A in
the
top
right
corner
to
increase
or
decrease
the
font
size.
- Tap on the recipe box to return to the box
of
recipes, or the recipe card to return to the
recipe card edit screen.
- iPad will
not
turn off when in Cooking
Mode.
|
|
Frequently Asked Questions:
Q) How do I enter my own
ingredients if they
are not in the list?
A) When
the
ingredient list popover is in view, tap on the "+"
button at the
bottom of the popover. Any text you already
entered during search
will be preloaded.
Q) I've got a
complicated ingredient: "4
- 14.5 oz cans of stewed tomatoes" How do
I enter that one?
A) Use
"items" for the type of measurement (the 'egg'
icon). Enter 4 for
the amount. Then use the "+" to add a new
ingredient and type
"14.5 oz cans of stewed tomatoes" as the
ingredient name.
Q) How do I enter
directions within the
ingredient list? For example I need to add
"2 Tbsp olive oil,
divided".
A)
Enter
"2" and "Tbsp" in the amount. For the ingredient,
you can either edit
an existing ingredient (but it changes all the
recipes that use that
ingredient), or add a new one. Tap on the
"+" at the bottom of
the ingredient popover. Enter "olive oil, divided"
as the new
ingredient name. You can enter as much info
associated with the
ingredient as needed.
Alternately, if you have a complicated set of
ingredients and do not
wish to enter them all into the ingredient part of
the recipe, you can
enter the whole recipe by hand in the directions
area. When you
display the recipe for cooking, you'll see the
whole text. This method
can also be used if you just want to copy/paste a
recipe from the
internet or email. Merely paste the whole text
into the directions
area. The only drawback is that you will not
be able to use the
sizing function, but you can add specific
ingredients for recipes as
the need arises.
Q) How do I backup my
recipes? I would hate to
lose all that work.
A)
Just sync
with
iTunes or with iCloud
Backup
after entering recipes. All recipes are
automatically backed up during sync. We recognize
that your recipe data
is very important to you, so we've taken extra
steps to ensure the
integrity of the database. Your entries are
all saved as you
go. We do recommend that you backup with
iTunes or iCloud
frequently (or
after entering data) as the backup is only as good
as the last sync.
You can also create
a
second
backup
copy while in iTunes on your computer. In
the
"Apps" tab, scroll down to "File Sharing".
You will see Recipe
Manager with Serving
Sizer listed. You can make an additional copy of
the
database to save on your computer. This step
is especially useful
if you accidentally erase the app from your
device, which causes all
the data to delete as well (you are prompted that
this will
happen). If you have the second backup, you
can reinstall the app
to your iPad, then bring in the backup and restore
your data. Apple has written
a tutorial on
how to do the File Sharing backup (and restore).
Q) I can no longer find
the app on my iPad
after I closed it.
A)
Most likely you didn't close it, but deleted
it. There is no way
that the app will self-delete.
Unfortunately, on the iPad, an "X"
badge on the app (while they are wiggling, after
you hold down an
icon), indicates DELETING the app. When you
delete the app, all
the data is also deleted as well. You do get
an "are you sure?"
prompt, but sometimes we are conditioned to just
tap on those. Be
careful. If you want peace of mind, we
recommend making a backup
copy after syncing with iTunes, using "File
Sharing" (see previous
FAQ). The extra back up can be used to restore the
data if you delete
and reinstall the app.
Q) How can I get the
recipes into my iPad? Do
I really have to type these in?
A)
Mobile devices can be labor-intensive for data
entry, so we are looking
at improvements for importing already typed
recipes, and recipes on the
internet. However, we do already support
copy/paste. We use
Recipe Manger with Serving Sizer in our own
kitchen and often pull
recipes off the internet (you can also do this by
emailing your recipes
to your iPad). We copy and paste the entire
recipe into the
"Directions" area of the app. This way we
can view everything
just fine when in "Cooking Mode" (full
screen). When we find the
need to resize the recipe, that is when we enter
in the ingredients
separately. We found it takes but a few
minutes to "read" the
ingredients from the pasted area in Directions and
enter in the
ingredients.
Our goal for the app was to make data entry as
quick as possible.
That's why we included 500+ basic ingredients to
pick from (but you can
add your own), the sliders for entering fractional
amounts, and the
sliders for picking units. We're always open
for suggestions for
improvements, so please feel free to contact
us with your experiences.
Q) I
can't seem to add more
ingredients after I've gotten to the bottom of
the page.
A) The
ingredients
and
directions
scroll
separately.
Flick
on
the
ingredient
side
of
the page to find "add new ingredient" which has
scrolled off
the screen after adding the last ingredient.
Q) How do I add a color
or style to my recipe
cards?
A) Tap
the
artist's
palette
icon
on
the
toolbar
to pull up available styles.
Tap to select. To add more designs (some
free and some for
purchase), tap Add
More Designs
and
pick the styles you wish to install. More
styles are forthcoming.
Q) What's the difference
between Serving Sizer
Recipe Cards and Recipe Manager with Serving
Sizer?
A) Recipe
Manager
with
Serving
Sizer is the new name. Based on feedback, we
determined that Recipe Manager is a more apropos
title for the app, as
it manages your recipe collection, doing so much
more than just
adjusting the serving sizes. It is the same
app. Also,
Serving Sizer Pro on the iPhone is the sister app
to Recipe Manager.
You can transfer the recipe database from either
app. The iPhone
version is not as feature rich as the iPad
version, but is still
actively being developed and improved.
|
|
Also available for the iPhone (compatible
with the iPad):
|
 Serving
Sizer
Pro Serving
Sizer
Pro
recipe converter and cookbook
 |
|
 Serving
Sizer Serving
Sizer
recipe converter
|
|
|
|
 Trip
Boss Trip
Boss
Travel
Manager
|
|
 Trip
Boss Trip
Boss
Expense
&
Budget
|
|
|
|
 Trip
Boss Trip
Boss
Itinerary
Manager
|
|
 A
Journal A
Journal
for
Trip Boss
|
|
|
|
 Date
Wheel
Date
Wheel
date
calculator
|
|
 Tip
Boss Tip
Boss
Tip
Calculator
|
|
|
|
|


